An HTTP request arrives at your service with the header Authorization: Bearer <long string>. That string — the access_token — was issued by Keycloak after the user logged in. And before the service runs a single line of business logic, it must answer one simple question: is this token genuine, was it really issued by our Keycloak, and has it not expired yet? If you skip the check, anyone can plug in any string and get access to someone else's data.
The good news: Spring Boot can validate such tokens with almost no code from you. The bad news: until you understand which hands the request passes through inside Spring, it all looks like magic — you write three lines of configuration, and suddenly some requests go through while others bounce off with a 401 error. Let's take this "magic" apart piece by piece — who checks the token, and in what order.
Before walking that path through the filters, let's look at what validating the token locally buys you and what it costs.
Local validation against JWKS removes the Keycloak call from every request: while Keycloak is down for a minute, introspection lets through none of the 600 requests, and validation against the keys in memory lets through all 600. The price — a revoked token stays valid until exp runs out.
Why validate the token yourself instead of asking Keycloak
The most straightforward path is to call Keycloak on every incoming request and ask: "here's a token, is it still good?" You actually can do this (the technique is called introspection), but it has two problems. First — an extra network call on every request: the service gets slower, and Keycloak becomes a bottleneck under load. Second — a hard dependency: if Keycloak goes down for a minute, your service stops letting anyone in at all, even with valid tokens.
That's why a modern Keycloak access_token is issued in JWT (JSON Web Token) format. It's a self-contained token: inside it already sit the user's data and a cryptographic signature made with Keycloak's private (secret) key. The signature can be verified locally, with nothing more than the matching public key. The service doesn't need to ask anyone on every request — it downloads Keycloak's public keys once and from then on checks signatures itself.
An analogy: the token is like a paper pass with a watermark. The guard at the entrance doesn't phone the print shop for every visitor — they learned once what the correct watermark looks like and check it on the spot in a second. In exactly the same way Spring memorizes once "what our Keycloak's signature looks like" and from then on validates tokens on its own.
The service's role in this scheme is called OAuth2 Resource Server. Remember this split of roles: Keycloak logs users in and issues tokens, while your service only receives and validates them. It doesn't mint tokens itself and doesn't authenticate users.
And so as not to confuse the token format with how it's validated: "JWT vs opaque" is about the format of the access_token, not about some separate token. A JWT (by-value) carries its data inside itself and is validated locally against the public key. An opaque token (by-reference) is just a random identifier string, whose data has to be requested from Keycloak via introspection. Keycloak issues JWTs by default, and this article is about them.
Where Keycloak keeps its public keys: JWKS
To verify the signature locally, you need Keycloak's public key. Keycloak serves its public keys at a special address as a set of keys in JSON format — this is called JWKS (JSON Web Key Set). For a realm named myrealm the address looks like this:
https://keycloak.example.com/realms/myrealm/protocol/openid-connect/certs
Here two key Keycloak terms surface that are important not to mix up:
- realm — an isolated space with its own users, roles, and keys. Each realm has its own set of keys in JWKS. A token from one realm won't work for another.
- client — an application registered inside a realm. The frontend receives a token "on behalf of" some client; your backend validates tokens issued within the same realm.
Spring downloads the JWKS once, caches the keys in memory, and from then on checks the signature of every incoming token against those keys. It goes to Keycloak for keys rarely — only when Keycloak rotates (changes) its keys and an unknown signature shows up — not on every request.
Step 1: one dependency
Everything you need for the Resource Server role is packaged into a single Spring Boot starter. For Gradle:
implementation 'org.springframework.boot:spring-boot-starter-oauth2-resource-server'
For Maven:
<dependency>
    <groupId>org.springframework.boot</groupId>
    <artifactId>spring-boot-starter-oauth2-resource-server</artifactId>
</dependency>
This starter pulls in both Spring Security and the libraries for parsing and validating JWTs. You don't need to add a separate JWT parser by hand — it's all already inside.
Step 2: where to fetch the keys
Next you have to tell Spring which Keycloak and which realm to fetch the public keys from. One line in application.yml is enough. There are two options — pick one of the two.
Option A — issuer-uri (recommended). You point to the realm's own address, not directly to the keys:
spring:
  security:
    oauth2:
      resourceserver:
        jwt:
          issuer-uri: https://keycloak.example.com/realms/myrealm
What happens at application startup: Spring goes to <issuer-uri>/.well-known/openid-configuration — the realm's "business card", where Keycloak itself describes all of its addresses. From there Spring learns the exact JWKS address, downloads the keys, and assembles a token validator from them — a JwtDecoder object (more on it below). As a bonus, Spring remembers which issuer (the iss field inside the token) counts as "ours" and will automatically reject tokens issued by a foreign realm.
Option B — jwk-set-uri. You give the keys' address directly:
spring:
  security:
    oauth2:
      resourceserver:
        jwt:
          jwk-set-uri: https://keycloak.example.com/realms/myrealm/protocol/openid-connect/certs
When you need this. Option A contacts Keycloak already at startup — for that very "business card". If Keycloak is unavailable at that moment, your service won't come up. Option B doesn't go to Keycloak at startup — the keys are pulled on the first request that carries a token. The price for that is the loss of the automatic iss check (if you want it, you add it separately). In practice issuer-uri is more convenient almost always — discovery and issuer validation "out of the box" are worth more than startup independence.
Step 3: what requires a token and what's open — SecurityFilterChain
The dependency and the keys' address taught the service to validate the token. But we still haven't said which requests require a token at all. A monitoring health-check should respond without any token, but protected data — only with a valid one. This is described by the SecurityFilterChain bean:
@Configuration
@EnableWebSecurity
class SecurityConfig {

    @Bean
    SecurityFilterChain filterChain(HttpSecurity http) throws Exception {
        http
            .authorizeHttpRequests(auth -> auth
                .requestMatchers("/actuator/health", "/public/**").permitAll()
                .anyRequest().authenticated()
            )
            .oauth2ResourceServer(oauth2 -> oauth2.jwt(withDefaults()));
        return http;
    }
}
It reads top to bottom, like a list of rules:
permitAll()— the health-check and everything under/public/**are accessible without a token;anyRequest().authenticated()— everything else requires a valid token;oauth2ResourceServer(... .jwt(...))— the key line: "the tokens that arrive are JWTs, validate them the way it's configured inapplication.yml".
The import for withDefaults is org.springframework.security.config.Customizer.withDefaults.
Here begins what this article is really about. The word Filter in the bean's name is no accident. Spring Security is not a single validator but a chain of small filters that each request passes through one by one before it reaches your controller. One of them can pull the token out of the Authorization header, another verifies the signature, a third lays out the roles. Let's walk through this conveyor step by step.
What happens inside: the request's path through the filters
When the line .oauth2ResourceServer(... .jwt(...)) ran at startup, Spring added the BearerTokenAuthenticationFilter filter to the chain. This is the first link that touches the token. Its job is narrow: look at the Authorization header, and if it contains Bearer <token> — pull out that string. If there's no header, the filter simply lets the request pass on without failing (then later the authenticated() rule kicks in and returns 401 for protected paths).
Next, the pulled-out string needs to be validated. That's handled by the JwtDecoder — the very object Spring assembled in step 2 from the JWKS public keys. The decoder does several things in a single pass, and all of them locally, without contacting Keycloak:
- it checks the token's signature against the public key from JWKS — this is the guarantee that the token was issued by our Keycloak and no one tampered with it;
- it checks the validity period — the
expfield (has the token expired) andnbf(is it not "from the future"); - with the
issuer-urioption, it checks the issuer — that theissfield belongs to your realm and not a foreign one.
If the decoder approved everything, we have a parsed token — a Jwt object with its contents (claims). But Spring still doesn't know what permissions the user has. That's handled by the JwtAuthenticationConverter — an adapter that looks at the token's claims and turns the roles in them into "authorities" that Spring understands. By default it looks for permissions in a place other than where Keycloak puts them — there's a separate section on that below.
Finally the filter puts the result — a JwtAuthenticationToken object (which holds both the Jwt itself and the list of authorities) — into the SecurityContext. From this moment the user is considered authenticated, and the request goes on to your controller, where the user's data is already available.
Here's that path in full. What the diagram shows: the request passes through the filter that extracts the Bearer token, then the token is validated by JwtDecoder against the keys from Keycloak, the converter lays out the permissions, and only then does the controller get control.
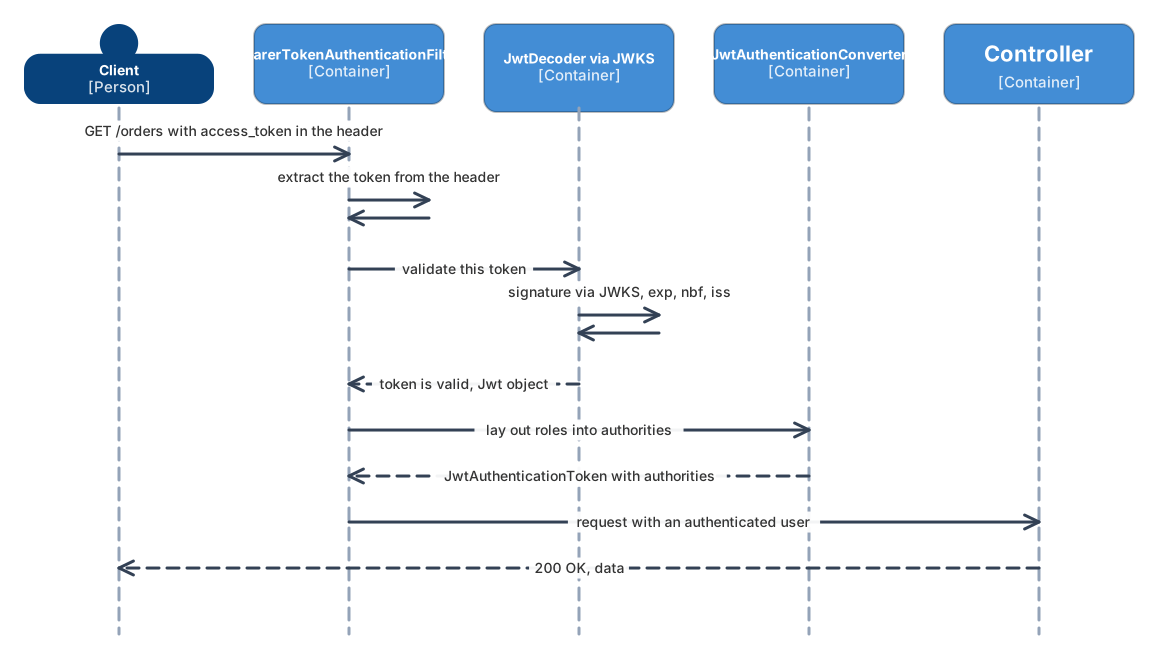
The key thing to take away: by the time your code in the controller starts working, the token is already validated — the signature matched, the period hasn't expired, the issuer is ours. You don't need to check anything by hand.
What happens with an invalid token: the 401 response
Now the reverse branch — the most common source of a beginner's bewilderment: "why does my request return 401?". A token can turn out invalid at any of the steps. For example:
- there's no
Authorizationheader at all (you forgot to attach the token); - the token has expired — the
expfield is already in the past; - the signature doesn't match — the token was forged or issued by a foreign Keycloak;
- the issuer is foreign —
issdidn't match your realm.
In all these cases the JwtDecoder rejects the token, the filter doesn't put an authentication into the SecurityContext, and the triggered handler (AuthenticationEntryPoint) returns 401 Unauthorized to the client. The crucial detail: this happens before your controller — your code isn't called at all. The business logic is protected right at the entrance.
Don't confuse the two response codes. 401 Unauthorized — "I don't know who you are": there's no token or it's invalid. 403 Forbidden — "I know who you are, but you don't have enough rights": the token is valid, the user is authenticated, but they lack the required role for this action. 401 is about validating the token (this article), 403 is about checking permissions.
What the diagram shows: the same path, but JwtDecoder rejected the token, and the client gets a 401 without reaching the controller.
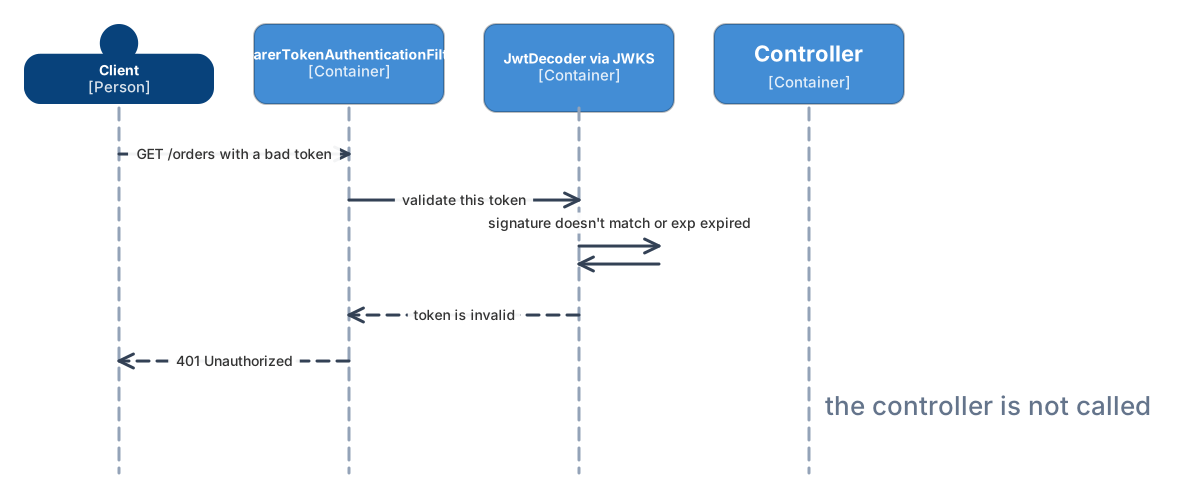
If you see a 401 in the logs on a request that should have gone through, it's almost always one of the four points above. Look inside the token itself (its contents aren't encrypted, it's easy to read) and check exp and iss.
How to get the user and their data out of the token
The token has passed validation — now the logic needs the data from it: who this is, what their email is. The token's contents are called claims — they're just key-value pairs: sub (the user's identifier), preferred_username, email, and so on.
The simplest way to reach them is to ask Spring to pass the parsed token straight into the controller method:
@GetMapping("/me")
public String me(@AuthenticationPrincipal Jwt jwt) {
    String userId   = jwt.getSubject();                  // claim "sub"
    String username = jwt.getClaimAsString("preferred_username");
    return "Hello, " + username + " (" + userId + ")";
}
The same token is also available through the SecurityContext, if you need to reach it outside a controller — for instance, in the service layer. The authentication object here is JwtAuthenticationToken, the very one the filter put into the context:
Authentication auth = SecurityContextHolder.getContext().getAuthentication();
Jwt jwt = ((JwtAuthenticationToken) auth).getToken();
String userId = jwt.getSubject();
A small but important tip: to identify a user, take the sub claim, not the name or email. sub is an immutable technical identifier — it won't change even if the person changes their login or email. Tying data to preferred_username is a common mistake that comes back to bite you the first time a user gets renamed.
The gotcha: by default Spring doesn't see Keycloak's roles
This is the most common cause of "everything's valid, but hasRole doesn't work". The reason is that Keycloak and Spring have agreed differently on where in the token the roles live.
Keycloak puts the user's roles in the realm_access.roles claim (realm-level roles) and in resource_access (roles per specific client). But Spring Security by default looks for permissions in a completely different place — in the scope claim. As a result, a fresh project behaves oddly: the token is valid, the user is let in via authenticated(), but any role check (hasRole("admin")) fails — Spring simply didn't find where Keycloak recorded the roles and assumes the user has none.
Here's where the JwtAuthenticationConverter from the diagram above comes on stage. By default it looks in the wrong place; our job is to explain to it where to fetch roles from in Keycloak:
@Bean
JwtAuthenticationConverter jwtAuthenticationConverter() {
    JwtAuthenticationConverter converter = new JwtAuthenticationConverter();
    converter.setJwtGrantedAuthoritiesConverter(jwt -> {
        var realmAccess = jwt.getClaimAsMap("realm_access");
        if (realmAccess == null) {
            return List.of();
        }
        @SuppressWarnings("unchecked")
        var roles = (List<String>) realmAccess.get("roles");
        if (roles == null) {
            return List.of();
        }
        return roles.stream()
            .map(role -> new SimpleGrantedAuthority("ROLE_" + role))
            .map(GrantedAuthority.class::cast)
            .toList();
    });
    return converter;
}
Why the ROLE_ prefix. This is a long-standing Spring convention: when you write hasRole("admin"), under the hood Spring looks for an authority named ROLE_admin. So, when laying out roles from Keycloak, we append this prefix to them — otherwise hasRole again finds nothing.
And the last step, which is easy to forget. Since SecurityFilterChain is declared explicitly (as in step 3), the converter also needs to be passed into .jwt(...) explicitly — the bean won't be picked up on its own:
.oauth2ResourceServer(oauth2 -> oauth2
    .jwt(jwt -> jwt.jwtAuthenticationConverter(jwtAuthenticationConverter())))
After this, roles from Keycloak start working in @PreAuthorize and in .hasRole(...).
A dangerous setting: how to accidentally turn 401 into 403 and break refresh
By default Spring Security already responds correctly: for an invalid or expired token — 401 Unauthorized, for insufficient rights — 403 Forbidden. There's nothing to configure. But there's a common trap: a developer wants to "tidy up" the error responses and overrides the handlers in the exceptionHandling block — and accidentally breaks behavior that was working on its own.
Here's what the harmful setting looks like — returning 403 for everything:
// BAD — now even an invalid token responds with 403
http.exceptionHandling(eh -> eh
    .authenticationEntryPoint((req, resp, e) -> resp.setStatus(403))
    .accessDeniedHandler((req, resp, e) -> resp.setStatus(403)));
Here authenticationEntryPoint is exactly the handler for the case "the token didn't pass validation" (no header, exp expired, signature didn't match). By replacing it with a 403 response, you told Spring: "for an expired token, respond as if the user lacks rights".
Why this hurts specifically for an expired token. An access_token lives briefly — minutes. When it expires, a well-behaved client should silently obtain a new access_token using its refresh_token and retry the request — the user doesn't even notice. But the client makes this decision based on the response code: it reads 401 as "the token went stale, need to refresh", and 403 as "the token is fine, but this action is forbidden for you, refreshing is pointless". By replacing 401 with 403, you deprive the client of the signal to refresh. On an expired token it gets 403, concludes "access denied", doesn't start a refresh — and the user ends up in a dead end: the client doesn't see fit to log itself out, but the service won't let it in.
The right approach is either to not touch anything at all (Spring's default is already correct), or, if editing the handlers is genuinely needed, to preserve the semantics of the codes:
http.exceptionHandling(eh -> eh
    .authenticationEntryPoint(new HttpStatusEntryPoint(HttpStatus.UNAUTHORIZED))
    .accessDeniedHandler((req, resp, e) -> resp.setStatus(HttpStatus.FORBIDDEN.value())));
HttpStatusEntryPoint(HttpStatus.UNAUTHORIZED) is a ready-made Spring handler that responds with 401 to authentication problems. This way an invalid token again yields 401 (the client goes off to refresh), and insufficient rights yield 403 (the client shows "access denied" and won't needlessly poke the refresh). The main rule is simple: don't override authenticationEntryPoint to 403. If you're not sure — don't configure exceptionHandling at all; the default does exactly what's needed.
In short
- In this scheme the service is an OAuth2 Resource Server: it doesn't issue tokens, it only validates incoming ones.
- A Keycloak access_token is a signed JWT; validation happens locally against the public keys, without calling Keycloak on every request.
- Keycloak serves its public keys at the JWKS address of its realm; Spring caches them.
- It's wired in with a single dependency —
spring-boot-starter-oauth2-resource-server. - In
application.ymlone line is enough:issuer-uri(recommended — gives discovery and theisscheck) orjwk-set-uri(without contacting Keycloak at startup). - Inside, the request goes through a conveyor:
BearerTokenAuthenticationFilterextracts the token from the header →JwtDecoderchecks the signature against JWKS,exp,nbf,iss→JwtAuthenticationConverterlays out the roles → controller. SecurityFilterChaindefines what requires a token and what's open; an invalid token →401 Unauthorizedbefore your code even runs. 401 — "I don't know who you are", 403 — "I know, but you lack rights".- The user's data is taken from the
Jwt(@AuthenticationPrincipal JwtorJwtAuthenticationToken); the reliable identifier is thesubclaim. - Keycloak's roles live in
realm_access.roles— for Spring to see them, you need aJwtAuthenticationConverterwith theROLE_prefix.
Further reading
- Realms, clients, roles, and users in Keycloak — how spaces, applications, and roles are structured, and where
realm_access.rolescomes from. - Authorization Code Flow and PKCE — how the frontend obtains that very Bearer token.
- Keycloak tokens: validation, refresh, revocation, and errors — what's inside a JWT, and how validation against JWKS works when keys change.
- Roles and access: RBAC and ABAC with Keycloak — what to do after validating the token: checking permissions,
@PreAuthorize, resource ownership.