You click "Sign in", the app suddenly whisks you off to a foreign page with the Keycloak logo, you type your password there — and end up back in the app, already logged in. Between those two clicks a whole chain of exchanges takes place, and if you don't know what happens inside, it all looks like magic. This magic is called the Authorization Code Flow, and we're going to walk through it slowly, one step at a time, explaining at each step not only "what happens" but also "why exactly this way".
What the diagram shows: three ways to deliver access to an app — what each one hands to whoever peeked at the address bar, and how the legitimate exchange differs from them.
An intercepted code turns into tokens on its own as long as a public client has nothing to prove it is the one that started the flow. PKCE provides that proof: the verifier is born inside the app and leaves only in a direct request to /token — without it a stolen code is useless.
Why the app doesn't ask for your password itself
Let's start with the very first question that nobody usually asks out loud: why doesn't the app show its own login form and ask for the password right there? That would be simpler — one form, no redirects.
The problem is that then the app would see your password. And there might be a dozen apps you sign into with the same account. Trusting your real password to each of them means multiplying it across all those servers. It's enough to hack one of them or embed malicious code in it, and the password leaks from everything at once.
The idea behind OAuth2 and OpenID Connect is different: the password is known to only one server — Keycloak. Such a server is called an Identity Provider (IdP) or an authorization server. All the other apps never see the password at all. Instead of a password, they receive tokens from Keycloak — short signed "passes" that confirm that you are you, and that you're allowed to do this and that.
From this grows the main technical challenge: how do you deliver a token from Keycloak to the app so that nobody intercepts it on the way? The answer to that question is exactly the Authorization Code Flow.
Who's who here
To avoid confusion further on, let's agree on four roles. These are standard OAuth2 terms, and you'll see them everywhere:
- Resource Owner — that's you, a live user. The owner of the data someone wants to access.
- Client — the app that wants to let you in and then fetch data on your behalf: a browser frontend, a mobile app, or a server-side backend.
- Authorization Server — Keycloak. It stores users and passwords, verifies logins, and issues tokens.
- Resource Server — your API, which checks the token it receives and returns data if the token is valid.
In Keycloak all of this lives inside a realm — an isolated space with its own users, roles, and settings. Each app registers inside a realm as a client. This model is covered in more detail in a separate article about realms, clients, and roles.
What's on the diagram: who passes what to whom in broad strokes, so you can hold the picture in your head.

The core idea: code first, tokens later
Before we dig into the steps, let's understand the central trick that this whole thing is built around.
The most naive approach is for Keycloak to just return the token straight into the browser, into the address bar. But the address bar is a public place: the URL ends up in the browser history, in server logs, in proxy logs, and it's visible to a neighboring extension. Putting a token there is like writing your password on a sticky note and wearing it on your forehead.
That's why the Authorization Code Flow splits delivery into two stages:
- First, Keycloak returns to the browser not a token, but an authorization code — a one-time, short-lived code. On its own it's useless: you can't present it to an API, and you can't get data with it.
- Then, in a separate request (not through the address bar, but directly to the Keycloak server), the app swaps this code for real tokens.
The point of this split: the code travels through a "dirty" channel (the browser), while the tokens travel through a "clean" one (a direct server request). Even if someone peeks at the code in the address bar, without the second step they get nothing.
The flow step by step
Now let's go through the whole flow from start to finish, one step at a time, with a "why" explained at each step.
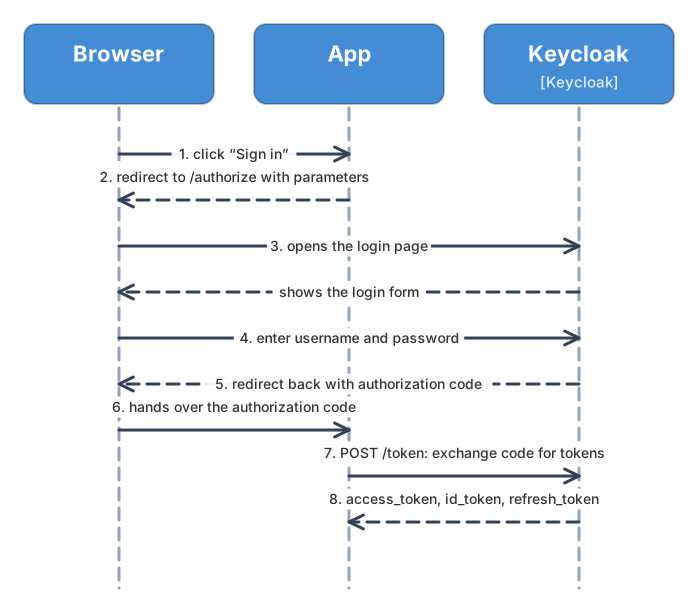
What's on the diagram: the full sequence — from clicking "Sign in" to exchanging the code for tokens. This is exactly the picture people hold in their heads when they say "Authorization Code Flow".
And now the same steps in words.
Step 1. You click "Sign in". Nothing special yet — just an ordinary click in the app.
Step 2. The app redirects the browser to Keycloak. It builds the /authorize address of the Keycloak server and puts request parameters into it. Let's go through them, because each one is there for a reason:
client_id— who's asking. From it, Keycloak figures out which app has arrived.redirect_uri— where to return the user after login. Keycloak will only allow a redirect to an address configured in advance in the client's settings — this is protection against being led off to a foreign site.response_type=code— "I want an authorization code" (not a token right away). It's exactly this line that turns on the secure two-stage flow.scope=openid ...— what the app wants to learn. Theopenidvalue is mandatory if you need login via OpenID Connect.state— a random string that the app remembers and checks on the way back. It protects against request forgery (CSRF) — so that the returned response definitely matches the request you started.
Step 3. Keycloak shows its own login page. The browser ends up on the Keycloak domain. This is an important moment: the password form is on Keycloak's side, not the app's. At this point the app doesn't see the password and can't see it.
Step 4. You enter your username and password. Keycloak checks them and, if needed, asks for a second factor. All of this happens inside Keycloak.
Step 5. Keycloak sends the browser back — with the code. Login succeeded, and Keycloak redirects the browser to that same redirect_uri, appending code=ABC... to the address. That's the authorization code. Let's stress it once more: this is not a token, but a one-time code that on its own opens nothing.
Step 6. The code reaches the app. The browser opens the app's redirect_uri, and the app extracts the code from the address. At the same time it checks state — is this the request that was started?
Step 7. The app swaps the code for tokens. It makes a separate POST request to /token — Keycloak's token endpoint — and puts the received code into it. The key point: this request goes directly to the Keycloak server, bypassing the browser's address bar. A confidential client (a backend with a secret) immediately presents its client_secret, proving that it is itself.
Step 8. Keycloak returns the tokens. In response to a correct exchange, three different tokens arrive, and each has its own role — they're easy to mix up, so we'll break them down separately below.
After this the app can already call your API, attaching the access_token — but that's already beyond the flow itself.
Three tokens and their roles
In the response at step 8, three tokens arrive at once. This is the most common point of confusion, so let's lay it out strictly:
- access_token — a pass to the API. The app puts it in the
Authorization: Bearer <access_token>header of every request to your API. This is the only token that goes to the API. - id_token — an "identity document" for the app itself: who logged in (name, email, identifier). This is part of OpenID Connect. The client needs the id_token to know whom it let in; it is not sent to the API.
- refresh_token — a "renewal ticket". When the access_token expires (and it lives a short time, usually minutes), the app sends the refresh_token back to Keycloak's
/tokenand gets a fresh access_token without bothering the user again. The refresh_token travels only back to Keycloak, nowhere else.
What's on the diagram: where each token is headed. You can see that the three tokens move in three different directions.

One thing to note separately: sometimes the access_token is not a JWT but opaque — an opaque string that the API can't verify locally and instead asks Keycloak "is this token still alive?" (introspection). This is not a "fourth token", but a different format of the same access_token: by-value (JWT, verified on the spot via JWKS) versus by-reference (opaque, verified with a request to Keycloak). We won't touch the details — that's a separate topic about how tokens are built and verified.
Why PKCE is needed
Let's go back to steps 5–6. The code arrives in the browser. But what if a malicious app or an evil extension is lurking on the device and intercepts this code at the moment it returns? Then the attacker will go to step 7 themselves and swap the stolen code for tokens — and log in as you.
This is especially acute for public clients — SPAs in the browser and mobile apps. They have no reliable place to hide a secret: the whole app's code is out in the open, and any client_secret baked inside will sooner or later be pulled out. That is, at step 7 a public client can't prove "it's me" via a secret. So nothing stops the code interceptor from doing the exchange themselves.
PKCE (Proof Key for Code Exchange, pronounced "pixy") closes exactly this hole. The idea is to tie the start (step 2) and the exchange (step 7) together with a one-time secret that is born inside the app and never leaves it:
- Before the start the app generates a random string — the
code_verifier. This is the secret; it stays inside the app and is never sent anywhere. - A hash is computed from it:
code_challenge = BASE64URL(SHA256(code_verifier)). The hashing method is called S256. - At step 2 (redirect to login) the app sends the
code_challengeandcode_challenge_method=S256to Keycloak. Keycloak remembers this challenge alongside the code it will later issue. - At step 7 (code exchange) the app sends the
code_verifieritself. - Keycloak recomputes the hash from the submitted verifier and compares it with the remembered challenge. A match — it issues the tokens. No match — it refuses.
What's on the diagram: where the challenge appears and where the verifier appears. You can see that the secret (the verifier) only leaves on the final direct request.
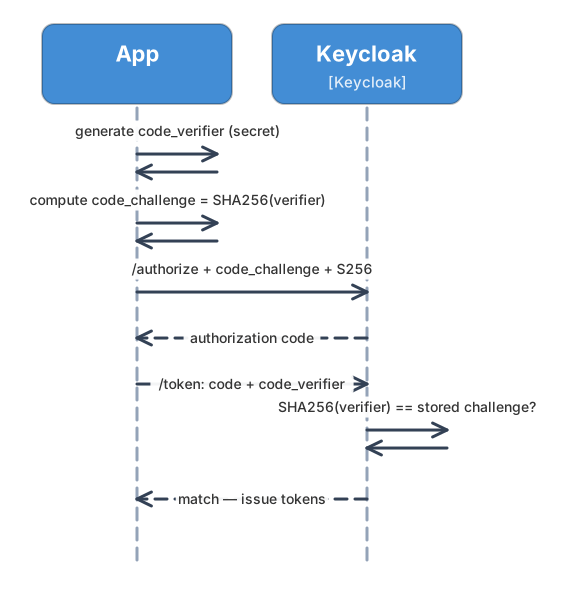
What the protection boils down to: the code interceptor (steps 5–6) knows only the code and, possibly, the challenge — but doesn't know the code_verifier, since it never left the app. And without the verifier, exchanging a stolen code for tokens is impossible.
It's important to use exactly the S256 method, not plain (where the challenge is simply equal to the verifier without hashing) — plain gives almost no protection, because then the secret itself is visible in the redirect.
In Keycloak, PKCE is enabled in the client's settings: Advanced → Proof Key for Code Exchange Code Challenge Method → S256. For public clients this is a mandatory setting.
Why the implicit flow is no longer used
There used to be a simplified variant for SPAs — the implicit flow. In it Keycloak returned the access_token straight into the browser, right in the address bar (response_type=token), without an intermediate code and without a second request. It was done that way once because browsers back then couldn't properly send requests to another domain.
The problem is exactly the one we started with: the token travels through the page address. It settles in the browser history, in server and proxy logs, and it's visible at the moment of the redirect. And renewing it neatly (via a refresh_token) wasn't possible either.
Today browsers make cross-domain requests just fine (via CORS), so the workaround is no longer needed. The implicit flow is considered outdated and insecure. In OAuth 2.1 — the next edition of the standard — it's removed entirely, and the Authorization Code Flow with PKCE becomes the default approach for all clients, including backends.
The conclusion is simple: always use the Authorization Code Flow with PKCE. Keep the implicit flow option in the Keycloak client settings (Implicit Flow Enabled) turned off.
Where to store tokens after receiving them
Let's say the tokens have been received. Where do you put them? Security depends directly on this, and there are two different strategies here.
Option 1: tokens on the backend (recommended for the web). Your server-side backend runs the whole Authorization Code Flow. It keeps the received access_token and refresh_token for itself, in a server-side session. Only a session cookie is handed to the browser — with the HttpOnly, Secure, SameSite flags. JavaScript on the page can't reach such a cookie in principle. Every frontend request goes through the backend, which itself attaches the right token and calls the API. This approach is called BFF (Backend for Frontend). This way the tokens don't sit in the browser at all — and even in an XSS attack there's nothing to steal.
Option 2: tokens in the browser (only if there's no backend at all). A pure SPA without its own server is forced to store tokens right in the browser — in the page's memory or in localStorage. This is vulnerable: any malicious script that gets onto the page through XSS will read localStorage and grab the tokens. PKCE protects only the code exchange itself — but not the storage of tokens after it. That's why localStorage is the least desirable option; at the very least keep the access_token short-lived, and the refresh_token in an HttpOnly cookie.
A simple rule: if you have a backend — store the tokens there (BFF), and hand only a protected cookie to the browser. This sharply narrows the attack surface.
How this is turned on in Spring
If a Spring app acts as a client, you use the spring-boot-starter-oauth2-client starter. It runs the Authorization Code Flow itself, puts the tokens into the server-side session, and wraps the frontend in a cookie. For a public client (without a secret — client-authentication-method: none) Spring adds PKCE itself — you don't need to compute anything by hand:
spring:
  security:
    oauth2:
      client:
        provider:
          keycloak:
            issuer-uri: https://keycloak.example.com/realms/my-realm
        registration:
          keycloak:
            client-id: my-spa
            authorization-grant-type: authorization_code
            client-authentication-method: none
            scope: openid, profile, email
Enabling the protection is literally one line, oauth2Login():
@Bean
SecurityFilterChain filterChain(HttpSecurity http) throws Exception {
    return http
        .authorizeHttpRequests(a -> a.anyRequest().authenticated())
        .oauth2Login(Customizer.withDefaults())
        .build();
}
And your API (the resource server) knows nothing about login at all. Its job is simpler: receive the access_token in the Authorization: Bearer ... header, verify its signature against Keycloak's public keys (JWKS, whose address is taken from issuer-uri), and let it through. This is a separate topic — see the article about integration with Spring Security.
In short
- The password is known to only Keycloak; the app doesn't see the password and receives tokens instead of it.
- The flow goes in two stages: first the browser brings back a one-time authorization code, then the app swaps the code for tokens with a separate direct request to
/token. - The code travels through the browser, the tokens don't; even an intercepted code is useless without the second step.
- On the exchange, three tokens arrive: access_token (to the API, via
Authorization: Bearer), id_token (who logged in — for the client, not sent to the API), refresh_token (only back to Keycloak, to renew the access_token). - PKCE ties the start and the exchange together with the
code_verifiersecret: at the start a hash goes out (code_challenge+S256), while the verifier itself goes out only at the exchange. An intercepted code can't be exchanged without the verifier. - PKCE is mandatory for public clients — SPAs and mobile apps, which have nowhere to hide a
client_secret. - The implicit flow is outdated (it returned the token straight into the page address); in OAuth 2.1 it's removed. Always use the Code Flow with PKCE.
- It's better to store tokens on the backend (BFF), handing the browser only an
HttpOnly/Secure/SameSitecookie;localStorageis vulnerable to XSS. - In Spring the client side is covered by
spring-boot-starter-oauth2-client+oauth2Login(); the API verifies the token separately.
What to read next
- OAuth2 and OIDC in plain words — roles, access/refresh/id_token, and how access differs from "who you are", if you need the basics before this article.
- Realm, client, roles, and users in Keycloak — what a realm and a client are, public versus confidential, and how roles get into the token.
- Keycloak and Spring Security: verifying tokens — how your API verifies the access_token signature via JWKS.
- Keycloak tokens: verification, refresh, revocation, and errors — how a JWT is built, renewal via refresh_token, logout, and common mistakes.